
Appearance
AVIF support
TIP
This article has been replaced with the "WebP, AVIF, and JPEG XL support" article.
Great, just as support for WebP is landing in all modern browsers (as of September 2020), there is now A NEW IMAGE FORMAT WE NEED TO CARE ABOUT! 🤯 And... it's awesome! 😩
TIP
TLDR;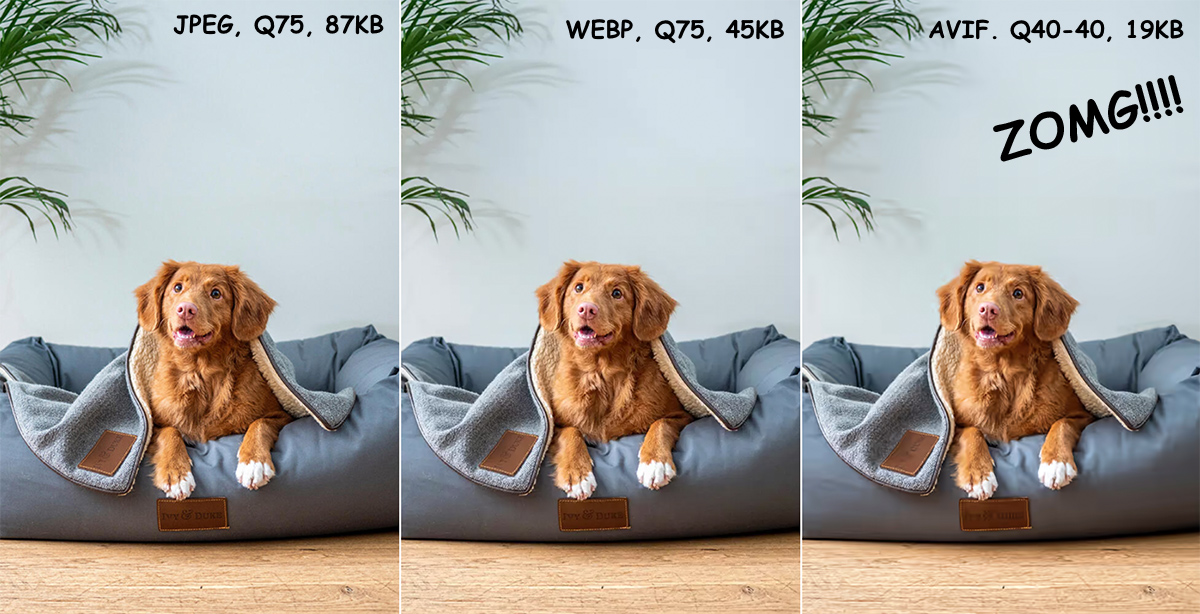
So, you haven't heard about AVIF? No stress, I hadn't either until a feature request popped up in the Imager X repo. Turns out AVIF is an interesting format that seems to have some traction behind it. It is developed by the Alliance for Open Media in collaboration with Google, Cisco, and Xiph.org (in cooperation with Mozilla), and aims to be an open-source, royalty-free image format. It sports both lossy and lossless compression, and support for transparency, animation, and HDR. In short, it has all the bells and whistles. And, Netflix is a fan.
Being bleeding edge, the support in browsers is not great, but Chrome 85 (which is just out) has support for it (at 69% market share, that's huge), and Firefox 80 has support behind a flag. That means you can start delivering AVIF today using progressive enhancement techniques (read on).
Adding AVIF-support in Imager X
Since support for AVIF in GD and Imagick in stable distros is probably a long way off, I decided to approach this using the same technique as I originally did with WebP, which means;
- Do the transform as requested using the selected
imageDriver. - Save the file in its native file format (jpg or png) in maximum quality.
- Use a command line tool to convert the temporary file to its target format.
It's not a perfect approach, it uses a bit more resources and can result in a loss of quality, compared to directly transforming an image into the correct format using only the imageDriver. In practice though, the results are still pretty good.
Installing an encoder
The only thing you need to get AVIF support in Imager, is some command line tool on your server that can convert to it. There are various tools available, but I've found cavif by @kornelski to be the easiest option by far. The releases contain executables with no dependecies for any Linux distro, and also MacOS and Windows.
For MacOS development there's also avifenc which is installable with brew, which makes it even easier to use for test purposes.
Configuring AVIF support in Imager X
You can add support for AVIF in Imager X using the customEncoders config setting.
If you went with cavif as your tool of choice, something like this should work:
'customEncoders' => [
    'avif' => [
        'path' => '/usr/local/bin/cavif',
        'options' => [
            'quality' => 80,
            'speed' => 7,
        ],
        'paramsString' => '--quality {quality} --speed {speed} --overwrite -o {dest} {src}'
    ]
]
Make sure to use the correct path for your environment, and configure whatever additional options you'd want. This is just an example.
TIP
There is usually a speed or effort setting, which controls how long the encoder should spend trying to optimize. In my tests with avifenc, it took 33 times longer to compress the AVIF file at speed 0, than at speed 10. And the gains in file size were only about 5-10%. Whereas at speed 6, it only took about 4 times longer, and the gains where almost the same. So, configure wisely.
Also worth mentioning; at the transform level, you can use the customEncoderOptions transform parameter to override one or more options for the encoder being used, as shown below.
{% set transformedImage = craft.imagerx.transformImage(image, {
    width: 600,
    format: 'avif',
    customEncoderOptions: { quality: 55 }
}) %}
Delivering AVIF images using progressive enhancement
As we've established, most browsers doesn't support AVIF yet. Luckily, there's no reason you can't deliver it to the browsers that do. The easiest approach is to use the <picture> tag with a separate source for each file format.
Here's an example that delivers either an image in the source format, or an AVIF or WebP version, depending on what the user's browser support:
{% set transformedJpeg = craft.imagerx.transformImage(image, 'myTransform') %}
{% set transformedWebp = craft.imagerx.transformImage(image, 'myTransformWebp') %}
{% set transformedAvif = craft.imagerx.transformImage(image, 'myTransformAvif') %}

<picture>
    <source srcset="{{ transformedAvif | srcset }}" type="image/avif">
    <source srcset="{{ transformedWebp | srcset }}" type="image/webp">
    <img srcset="{{ transformedJpeg | srcset }}"
         src="{{ transformedJpeg[0].url }}"
         alt="A very progressive image">
</picture>
This is the approach I recommend strongly. It's standards compliant, you deliver the same markup to all visitors (which makes caching for instance easy), and the only minor drawback is a sligthly bigger and more complex markup.
Another approach though, is to check what the browser supports before generating the transforms:
{% if craft.imagerx.clientSupports('avif') %}
    {% set transformed = craft.imagerx.transformImage(image, 'myTransformAvif') %}
{% elseif craft.imagerx.clientSupports('webp') %}
    {% set transformed = craft.imagerx.transformImage(image, 'myTransformWebp') %}
{% else %}
    {% set transformed = craft.imagerx.transformImage(image, 'myTransform') %}
{% endif %}

<img srcset="{{ transformed | srcset }}"
         src="{{ transformed[0].url }}"
         alt="A very progressive image">
With this solution, you'll be delivering different markup to different users, depending on what format they support. If you go down this route, make sure your caching accounts for this.
A third solution would be to do this at the webserver level. You'll typically create all the different transforms at once, but only output an <img> tag that only serves the jpg file. Then, in your webserver config, you check what the browser support, and append .avif or .webp to the filename conditionally if such a file exists. You can achieve this kind of naming schema in Imager by using the filenamePattern config setting at the template level. In practice... I find this a bit overly complex, unless you're an image transform SAAS that does this for a living.
Use <picture>!
Test results
In short, the results are good!
I find that most of the time, the AVIF images are easily 50-60% smaller than the Jpeg ones (which is in line with what others have reported), without much difference in quality, while the WebP images come in at around 20-40%. Reducing the quality drastically reduces the file size, and on some images I saw ridicoulous savings (~80-90%) with quality loss that would probably be lost (pun intended!) on most people. But I also noticed that it's really hard to consistently use high compression, as some images suffer alot more.
The quality loss is interesting though. It has quite a different feel to it than the compression in Jpeg and WebP. More video-ish, which I guess makes sense since the codec is also meant to compress video. The artifacts you get when compressing Jpeg files too hard is just butt ugly, edges suffer the most and the image just looks terrible. With WebP it's much better, but I find that compressed images tend to get almost a GIF-y feel to them. Big area gradients (like blue sky) tend to look like they have reduced colors, and feel slightly off.
With AVIF though, the compressed area seems almost smudged. Like if someone took that finger-tool in photoshop, and scratched the image with it. The amazing thing is that this mostly happens in the low-contrast areas, whereas the focus areas of the image stays pretty good. For instance, in the dog image at the top of this article, I noticed that the details on the dog bed got a bit smudged at quality set to 40, but the dog itself stayed pretty much as it was on lower compression rates.
So, should I use it?
Sure, why not? AVIF is here to stay, and even if it's still early days, you can achieve real performance gains today.
The only thing I'd say is that you have to be prepared to do some work to get it up and running and spend some time on testing and configuring the parameters. I generally found the settings in the different tools to be a bit overwhelming. Sure, you can just slap a number on quality, and forget about it, but...
Also, as always, be mindful that generating an extra set of transforms will be a performance drain on your server. I find the AVIF encoders to be particularily CPU-heavy, which is to be expected from a new and advanced codec. If you take the time to set up smart auto generation, this can mostly be negated, but at some point someone will hit a page with uncached content and missing images, and things will get rough. But, that's the price one has to pay to stay at the cutting edge, right? Who count CPU cycles anyway.
GO AVIF, I'm a fan!